You can change the battery in a Breitling quartz watch at home in just a few minutes. The physical swap is straightforward. The real job — and the moment most DIY repairs fail — is sealing the case back evenly without pinching or damaging the gasket. A tiny twist in the seal today lets humidity creep inside over the following weeks, and that turns a $10 refresh into a movement repair that costs hundreds. This guide walks you through every step, calls out the hidden trap that builders of these watches know and most owners miss, and tells you exactly when to set the tools down and visit a watchmaker.
Before You Start: Tools, Battery, and Prep
Work on a clean, flat surface with a microfiber towel underneath. Small parts can bounce, and a hard surface will scratch the crystal if the watch slips.
What you’ll need
- Correct battery: Breitling quartz models use a single silver-oxide cell from brands such as Renata, Sony, or Panasonic. Common types include 371, 373, 376, 394, and 399. Never use an alkaline cell — they leak and can corrode the movement permanently.
- Case back opener: Most modern Breitlings have a notched screw-down back. A three-prong adjustable opener or a sticky friction ball works for many references. A few Colt and Avenger models use a hex-shaped back that turns with a large coin (like a U.S. nickel) or a dedicated socket.
- Plastic or anti-magnetic tweezers: Metal tweezers can short the new battery or scratch the movement. Wood-tipped, ceramic, or plastic tweezers are much safer.
- Small screwdriver: Only if your watch has a battery hatch secured by a tiny screw (rare).
- Silicone grease and a clean toothpick or peg wood: For re-lubricating the gasket before closing.
- Case back press (optional): Needed only for snap-on backs; virtually all current Breitling quartz watches screw down, so you likely won’t need one.
- Lens cloth or blower: To dust the inside of the crystal and dial before reassembly.
Quick Battery Reference (verify with your specific watch)
| Model Family | Common Reference | Typical Renata Battery |
|---|---|---|
| Colt Quartz | A74380, A74388 | 373 |
| Superocean Quartz | A17360, A17367 | 376 or 371 |
| Avenger Quartz | A73390 | 371 |
| Navitimer Quartz | A88364 | 394 |
| Aerospace (analog/digital) | E79362 | 399 (or two separate cells — check the manual) |
Always confirm by reading the old battery’s markings or calling an authorized service center with your model number. A mismatch can cause poor contact, unpredictable behavior, or battery drain in days.
Step-by-Step Battery Replacement
Open the Case Back
Most Breitling quartz watches have either a full screw-down case back or a smaller dedicated battery hatch on the back. The approach differs slightly.
Watches with a screw-down case back (Superocean, Avenger, Colt, etc.)
1. Pull the crown out to the time-setting position (or time-only). On movements with hacking, this stops the seconds hand and releases stem tension, so you’re not fighting crown pressure while turning the back.
2. Wipe the case edge clean to prevent dirt from entering the threads.
3. Unscrew the case back. Start gently with a sticky ball or a three-prong opener. If the tool slips, it won’t gouge the metal; sharp metal tips can. Look for alignment dots or a flat notch — many Breitling backs have a subtle edge to help the tool catch.
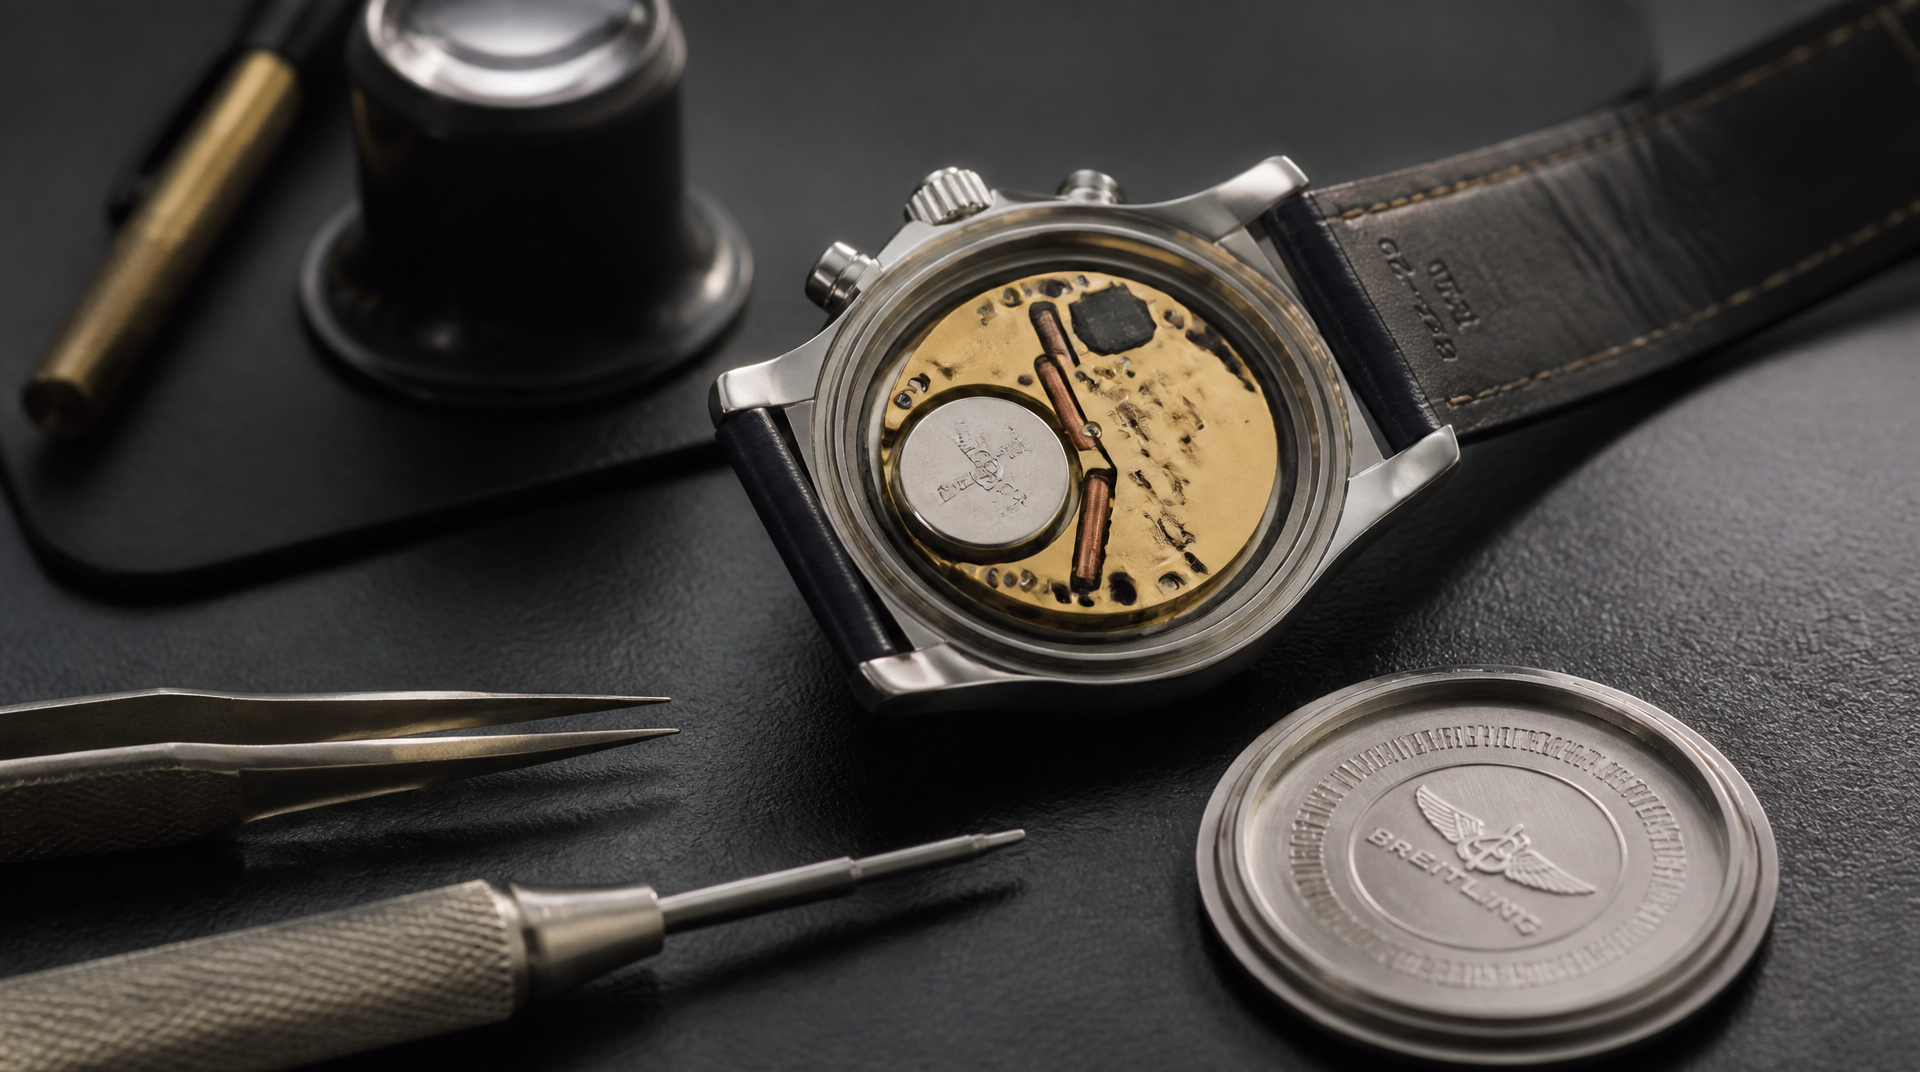
4. Set the watch dial-down on your microfiber cloth once the back is off. Note the orientation of the old battery: typically positive (+) side up, with a thin insulating sheet underneath. Also note which side the spacer or clamp sits on.
Watches with a dedicated battery hatch
A few Colt and older Professional models have a small round or hexagonal screw-down hatch instead of a full case back opening.
1. Identify the hatch type. If it’s a coin-edge slot, a U.S. nickel or quarter often fits; if it’s a clean hexagonal socket, use a correctly sized hex driver or a dedicated socket bit — never force a loose tool.
2. Turn counterclockwise with steady, even pressure to unscrew the hatch.
3. Lift the hatch off carefully. Use a non-marring plastic spudger if it sticks. Inside, you’ll find the battery retainer clip and the battery itself.
Remove the Old Battery
The single most skipped detail: there is almost always a thin insulating sheet or plastic insulator between the battery and the movement, or between the battery and a metal retaining clip. If you lose it or forget to put it back, the watch can short intermittently — it might run for a few hours, then stop mysteriously later. That’s the counter‑intuitive trap that sends many first‑timers back to a jeweler.
1. Slide out or lift off the retaining clip (if present) with plastic tweezers. Don’t bend metal clips; they are easily distorted.
2. Lift the old battery up using plastic tweezers, grasping only the edge. Note which side is up — almost always the flat side with the model number faces up (+) unless the movement is marked otherwise.
3. Remove the insulator. It might be a small plastic disc, a shaped Mylar sheet, or a thin ring under the battery. Set it aside in a safe spot; you will reuse it.
4. Inspect the battery contacts inside the movement for any blue or white residue. If you see corrosion, stop and consult a watchmaker — scraping it at home can damage the delicate circuitry.
Prepare the New Battery and Install It
1. Check the new battery’s voltage with a multimeter if you have one. A fresh silver-oxide cell should read at least 1.55 V. A cell that measures 1.45 V or less may not last.
2. Handle the new battery by its edge only; never touch the broad contact surfaces with bare fingers. Skin oil causes microscopic corrosion over time.
3. Place the insulator first if the design requires one underneath the battery. Then lower the battery into the recess, positive (+) side up, making sure it sits flat and fully engages the lower contact.
4. Reinstall the retaining clip or spring clamp exactly as it was. Press gently until it clicks or lays flush; a raised clip can touch the case back and short the circuit.
5. If your watch has a second cell (some Aerospace models), replace both at the same time with identical fresh cells. Old and new cells mixed together drain each other rapidly.
Inspect and Lubricate the Gasket
This step determines whether your watch stays water‑resistant. The rubber O-ring or flat gasket in the case back dries out and flattens with time.
1. Remove the gasket from the case or case back with a toothpick, never tweezers — metal tweezers can nick the rubber.
2. Wipe it clean with a lint‑free cloth. Look for cracks, flat spots, or permanent compression lines. If you see any damage, replace it with a genuine Breitling gasket before closing the watch. A compromised gasket will let moisture past.
3. Apply a very thin film of silicone grease to the gasket. A drop on your fingertip is enough; spread it evenly and wipe away excess. The goal is to restore suppleness, not to slather it.
4. Re‑seat the gasket in its groove, making sure it isn’t twisted. A twisted gasket will pinch during closing and fail.
Close the Case Back
This is where most at‑home jobs go wrong. The case back must seat evenly and fully so compression on the gasket is uniform.
Screw‑down case back
1. Double check that the gasket is properly seated and that no dust or fibers lie across it.
2. Place the case back onto the case and turn it counterclockwise gently by hand first to feel the thread engage. This prevents cross‑threading.
3. Press down gently while turning clockwise by hand until it stops. Only then use your opener tool for the final quarter turn — go until you feel firm resistance, not beyond. Overtightening can crush the gasket or strip the threads.
4. Look at the seam with a loupe or magnifying glass: the gap should be uniform all around. If one side is tighter, back off and try again. An uneven case back signals a pinched gasket.
Battery hatch
1. Ensure the hatch’s own small gasket is clean and lightly greased.
2. Thread the hatch by hand to avoid cross‑threading, then tighten with a coin or socket until snug. Don’t overtighten — the small threads are easy to strip.
Where People Get Stuck (and How to Avoid It)
Even a careful battery change can go sideways if you miss these classic failure points. Knowing them in advance turns a potential repeat visit into a one‑and‑done job.
- The missing insulator — As mentioned, a misplaced plastic sheet or Mylar disc creates an intermittent short. The watch may run for an hour, then stop, and you’ll blame the new battery. Always compare the insulator to the old battery before closing. If it’s gone, you can order a replacement insulator or have a watchmaker handle it.
- Pinched or twisted gasket — If the case back doesn’t sit perfectly flat, the rubber is being crushed asymmetrically. Even a hair of uneven closure creates a moisture path. If you feel a sudden increase in resistance during tightening, stop and reset the back. A twisted gasket will often show a slight bulge visible through the seam with a loupe.
- Overtightening the case back — You’re not torquing a lug nut. Once the back stops easily, a quarter turn more is enough. Continuing to crank can warp the threads or shatter the crystal from asymmetric stress. If the back squeaks, you’ve gone too far.
- Battery orientation confusion — The old battery’s top side usually has the number and a plus mark. But on some movements the positive side faces down. If you removed the old cell without noting the orientation, look for a “+” mark on the movement’s battery clamp or inside the recess. Installing backwards won’t damage the watch, but it simply won’t run, and forcing the clamp over a backwards cell can bend the contact.
- Skipping the gasket entirely — Rushing and letting the O-ring stay dry and flattened leads to zero water resistance. Even if you don’t swim, a hand wash or
Explore This Topic
- Back to Breitling
- Back to Breitling Battery
Related guides in this cluster:
- Breitling Watch Buying Guide: Are They Worth It in 2026?
- Breitling Watches: The Complete Brand Guide — Navitimer, Superocean & More
- How to Remove Breitling Watch Links: Easy Guide to Resize Your Bracelet

The We Know Watches editorial team brings together over 40 years of combined watch collecting, trading, and repair experience. Our editors have owned and handled watches from every major brand — from entry-level Seiko 5s to Rolex, Omega, Patek Philippe, and independent Swiss watchmakers. We’ve bought and sold at auction, worked with authorized dealers, visited manufacturing facilities in Switzerland and Japan, and serviced hundreds of movements ranging from the Seiko 7S26 to the Longines L888. Every guide and review we publish is based on hands-on experience, original research, and consultation with professional watchmakers. We do not accept payment for reviews, and we clearly disclose when we use affiliate links.