To size a metal watch bracelet at home, you remove links from the clasp side, and the method depends entirely on the link system your band uses—split pins, pin-and-collar, or screws. A basic pin pusher, a small hammer, and a steady work surface let you resize most steel and titanium bracelets in under 15 minutes. Solid-gold links or integrated ceramic bracelets are far less forgiving; if you’re not sure, stop and let a jeweler handle them.
What You Need Before You Start
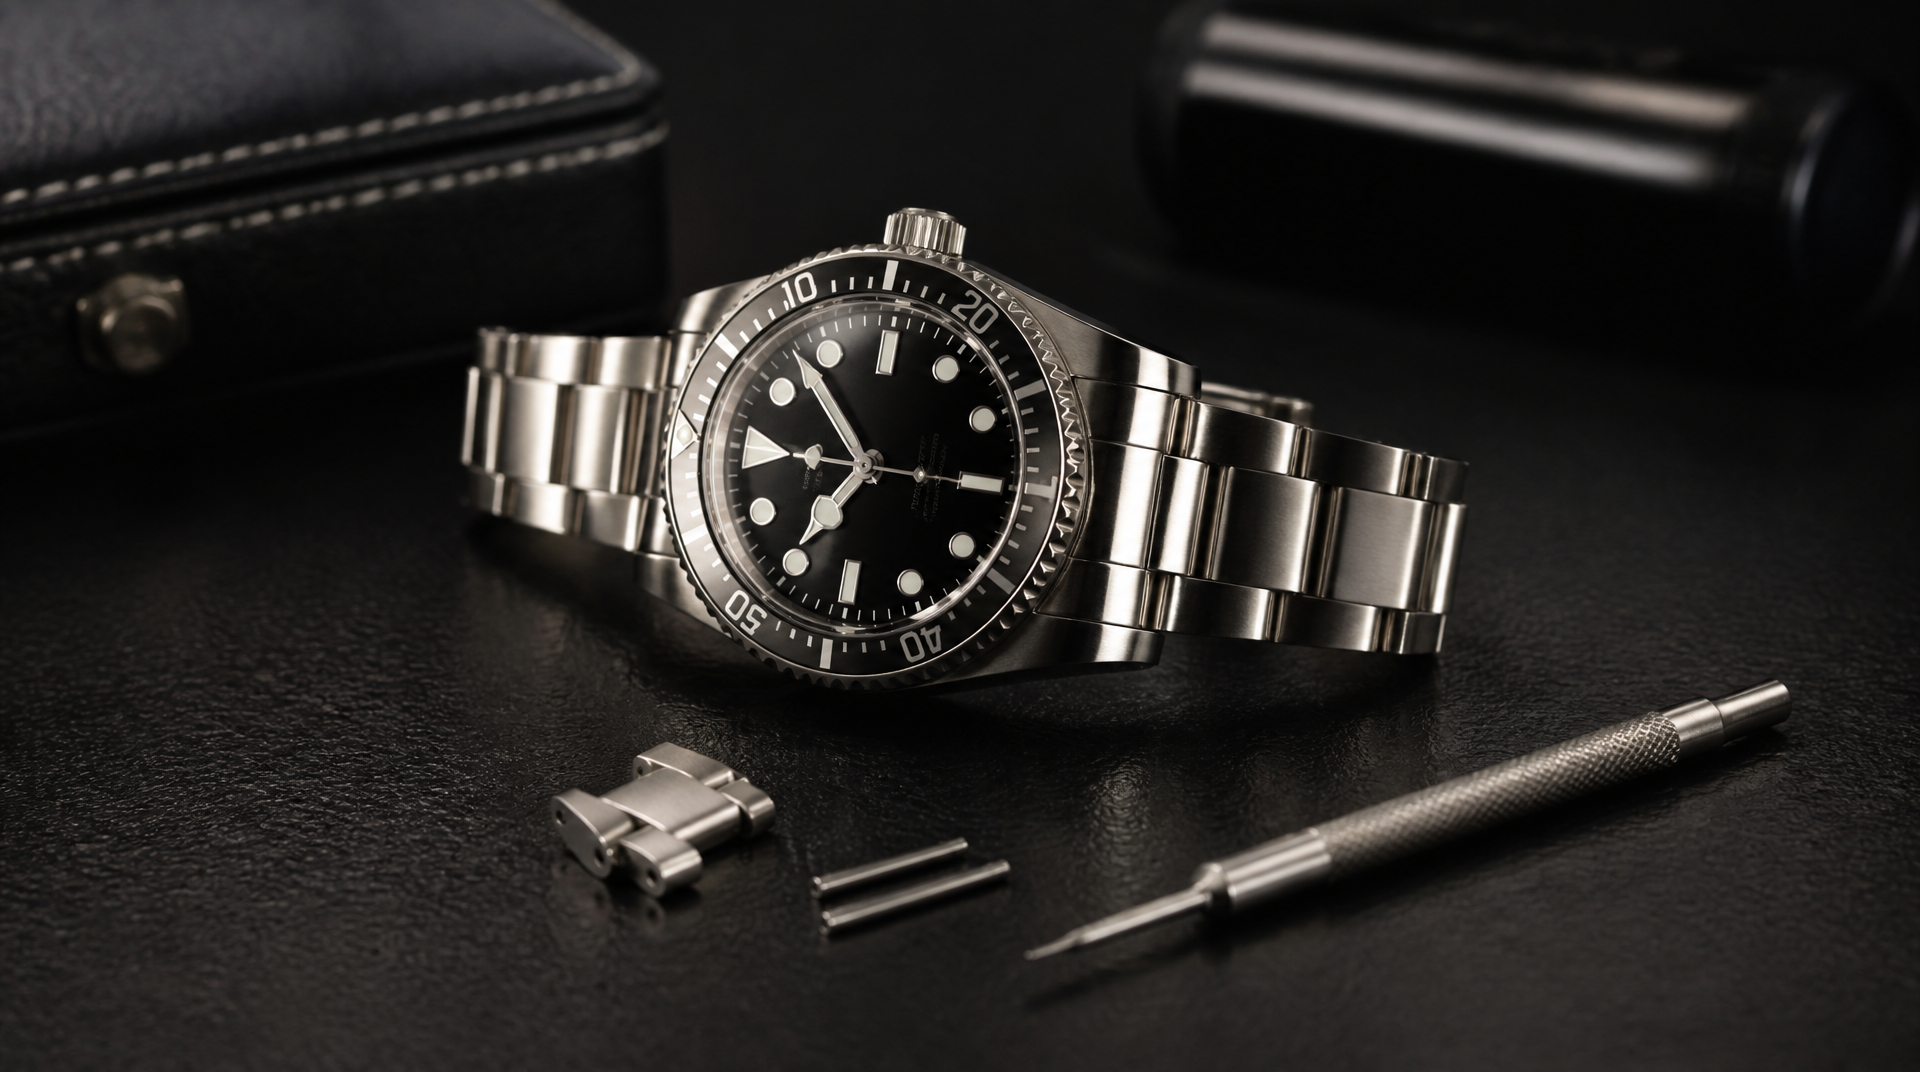
Gather your tools and set up a workspace that won’t let small parts escape. A bright desk lamp, a jeweler’s screwdriver set, and a microfiber cloth are the baseline. For the actual link removal, the kit depends on the link type (see the next section), but these items cover nearly every metal bracelet you’ll encounter:
- Pin pusher tool – a dual-ended steel punch with a 0.8 mm or 1.0 mm tip. Some have a hammer end, others are twist-type.
- Watchmaker’s or jeweler’s hammer – a light brass or nylon hammer that won’t mar steel. A small household tack hammer works if you pad the bracelet.
- Link removal block or bench block – a hard plastic or aluminum block with channels that support the bracelet. A folded towel keeps the watch from sliding.
- Tweezers – fine-point, non-magnetic if possible, to catch tiny collars and pins.
- Spring bar tool – only if you need to completely detach the bracelet from the watch case for better access.
- Plastic bag or clear zip-top bag – for capturing pin-and-collar systems (a rolled-up piece of masking tape works in a pinch). For high-stakes collars, a spare manufacturer collar kit ($10–$20) is cheap insurance against losing one.
Cover your work surface with a soft cloth and keep a magnet nearby only for steel parts—never for gold or titanium, which are non-magnetic and will end up on the floor instead.
Identify Your Bracelet’s Link System
Before you push anything, figure out what’s holding the links together. The answer changes the steps, the tools, and how likely you are to lose a part that can’t be replaced with a generic pin.
Look at the side of a removable link (usually the ones closer to the clasp). Use a loupe or phone magnifier if the markings are faint. You’ll see one of three setups:
1. Split pin (hairpin) – Looks like a tiny, flattened U or two skinny pins pushed toward each other from opposite sides. Common on many Seiko, Citizen, and Casio bracelets.
2. Pin and collar – A solid pin passes through the link, and a tiny metal sleeve (the collar) sits friction-fit inside the center section. The pin may have a flat head on one side. Rolex Oyster bracelets, Tudor, and many higher-end steel bands use this system.
3. Screw-in pin – A single pin with a visible slot on one end, like a miniature screw. Found on Omega, TAG Heuer, and plenty of microbrand bracelets. Sometimes both ends have a slot.
The table below gives you a quick decision signal before you commit to a tool.
| Link System | How to Spot It | Required Tool | Home-Friendly? |
|---|---|---|---|
| Split pin | Two segmented halves visible on one edge; no screw slots | Pin pusher or tweezers to compress tips | Yes, with care |
| Pin and collar | Solid pin with flush or slightly flat head; tiny collar seen through center link hole | Pin pusher (exact size) + catch bag | Yes, but collar loss risk is high |
| Screw-in pin | Single or dual screw-head slots on link edge | Correct jeweler’s screwdriver or screw-pin tool | Easiest; only risk is thread stripping |
The decision criterion that changes your approach: If the bracelet uses pins and collars and you can’t see a clean opening for the collar, stop and take it to a watchmaker. Collars are tiny, directional, and brand-specific—losing one often means ordering a replacement from the manufacturer, not a generic kit. If you have screw pins, you’re in the easiest lane. Split pins are middle ground.
Removing Links by System
Once you know the system, size the bracelet by removing an equal number of links from each side of the clasp to keep the watch centered. Always remove from the clasp end, not the watch-head end.
Split-Pin (Hairpin) Links
Split pins are two springy arms that press into a single hole. Removing them requires collapsing the arms inward.
1. Place the bracelet on a bench block or towel, pins facing you. Use a loupe to identify which side shows the split—the arms are visible as a seam.
2. Set the tip of your pin pusher into the seam point and apply gentle forward pressure while rocking the tool side to side. This collapses the arms so they slide out the opposite side.
3. Push only until the split pin starts emerging from the far side. Grab it with tweezers and pull it the rest of the way. Do not push the entire pin out in one go or you risk bending the arms.
4. Once the pin is out, separate the freed links and repeat for the next pin you need to remove.
5. To reassemble, push the split pin back through the link, starting with the side that shows no seam first so the split enters second. You will feel a firm snap when the arms spread inside the hole.
Pin-and-Collar Links
Collars are microscopic friction tubes that sit inside the center link. The pin compresses the collar to lock everything tight.
1. Work inside a clear zip-top bag or lay a rolled masking-tape ring on your bench to catch the collar. This step is non-negotiable.
2. Examine the link edge and decide which side to push from. Usually, the pin moves in one direction; push from the side opposite the flat cap, or toward the slotted/hollow hole. On a Rolex Oyster bracelet, for example, push from the non-crown side of the clasp toward the blade.
3. Place the correct-sized pusher tip (often 0.8 mm for Rolex, 1.0 mm for many others) against the pin and drive it through with firm, straight taps of a hammer. Watch inside the bag for the collar to drop.
4. Catch the collar immediately with tweezers. Without it, the bracelet will separate but will never reassemble tightly.
5. Remove the desired number of links. To rejoin, insert the collar into the new link’s central hole first, then tap the pin through until it’s flush. The collar must compress around the pin, not be pushed out the other side.
Screw-In Links
Screws look the easiest but are the most likely to be seized with threadlocker.
1. If both sides have a slot, use two screwdrivers. Otherwise, hold one side with a fixed pin vise and turn the other.
2. Apply heat sparingly with a hair dryer or warm water soak for 30 seconds if the screw won’t turn. Many manufacturers apply Loctite; heat softens it without damaging steel or titanium.
3. Turn slowly and keep even downward pressure so you don’t cam out and strip the slot. If the screw feels like it’s grinding, stop and reheat.
4. Remove the freed link and set the screw aside on a clean white surface. When reassembling, add a tiny dab of low-strength (purple) threadlocker if the bracelet originally had it, but often metal-on-metal friction is enough for a daily wearer.
Keep the Clasp Centered
Always remove equal links from both sides of the clasp unless your wrist shape demands a slight offset. Unclip the clasp and count the removable links on the 6 o’clock and 12 o’clock sides. If you need to remove a total of four links, take two from each side. This keeps the clasp centered under your wrist.
Do not remove all links from one side “to make it quicker.” An off-center clasp will make the watch sit crooked and the clasp digging into your skin. If you’re experimenting, start by removing one less link than you think you need—you can always take out another, but reinserting a pin-and-collar after you’ve already handled it invites wear. Fine-tune with the clasp’s micro-adjustment holes after link removal, not before.
What to Do When a Pin Won’t Budge
A pin that refuses to move almost always falls into one of these categories. Work through them in order.
- Threadlocker on screw pins. Heat is the answer. A hairdryer on high for 30–60 seconds (or a warm water soak, fully dried afterward) breaks down most low-strength compounds. If the screw still resists, you may be dealing with high-strength threadlocker—stop and let a pro apply solvent rather than stripping the head.
- Corrosion or dirt. Soak only the bracelet in a mild dish-soap solution, scrub the pins with a soft brush, and try again. If the pin moves but feels gritty, stop and clean the link channel before you push further; forcing grit through can score the pin and collar.
- You’re pushing the wrong direction. Pins and collars are directional. If the pin still doesn’t move with moderate force, flip the bracelet and push from the opposite side. Never hit a pin pusher hard enough to bend the tool tip.
- Solid end links or integrated designs. Some bracelets have decorative dummy pins that look removable but aren’t. If a pin doesn’t align with a removable-link seam, it’s likely cosmetic—leave it alone.
Escalation threshold: If you’ve tried heat and direction reversal and the pin still won’t move after two controlled attempts, or if you feel the pusher tip start to deflect, stop. A bent pin shank broken inside the link turns a $20 sizing into a $100 bracelet repair.
When to Stop and Hand It to a Professional
Walk away and head to a certified watchmaker or jeweler in these scenarios:
- The bracelet is solid 18k gold, platinum, or has ceramic center links. These materials scratch, crack, or deform under forces that steel ignores.
- It’s an integrated bracelet (like many Audemars Piguet Royal Oaks or vintage integrated-lug designs) where standard removal blocks won’t fit without special tooling.
- You lose a collar and can’t find a manufacturer-sourced replacement within a week. Generic collars rarely match the tolerance.
- Screw threads begin to strip or the slot becomes rounded. A jeweler can extract and replace the pin cleanly.
- After a clear attempt, you hear a sharp “ping” and a broken pin tip falls out, but the rest of the pin remains stuck in the link. Forcing it deeper makes professional extraction more expensive.
The cost at a jeweler for a straightforward steel bracelet sizing runs $15–$30 in most US markets—cheaper than replacing a scratched link or a lost collar kit.
Verify the Bracelet and the Fit
Before declaring the job done, confirm your work isn’t hiding a loose pin.
- Hold the watch by the bracelet and give it a gentle shake near your ear. You should hear no rattling or metallic clicking from the resized section. Any noise signals a collar that didn’t seat or a pin not fully driven in.
- Run a fingertip over each removed-link junction. Pins must sit absolutely flush, with no edge proud of the bracelet surface. A raised split-pin arm can catch on fabric and work loose over days.
- Flex the bracelet lightly near each modified joint. The link should pivot smoothly but without any side-to-side slop; play indicates a deformed collar or an oversized replacement pin.
Once the structural checks pass, slide one finger between the bracelet and the underside of your wrist. You should be able to do this without strain, and the watch shouldn’t rotate freely past the wrist bone. With your arm hanging at your side, the watch should sit just behind the ulna bone—not sliding into your hand. Walk around for two minutes and pay attention to any pain at the outer edges of the clasp. That often means the link distribution is uneven; flip the clasp orientation or rebalance links accordingly.
Frequently Asked Questions
Can I reuse a pin-and-collar set after removal?
Yes, as long as the collar hasn’t been crushed or lost and the pin isn’t bent. Slide the collar back into the central link, then tap the pin through until it sits flush. If the bracelet feels loose after reassembly, the collar may have been deformed; source a replacement from the manufacturer.
My bracelet has arrows stamped inside the links. What do they mean?
The arrows indicate the direction to push the pin for removal, usually pointing from the thick side of the link toward the side that shows the pin exit. Follow the arrow, not the opposite direction.
How many links can I safely remove before the clasp hits the curve of my wrist?
Most metal bracelets allow removal down to about 5–6 links on each side before the clasp sits at an odd angle. If you’re sizing for a wrist smaller than 6 inches, ask a jeweler to remount the clasp on a shorter section of the bracelet rather than just removing links from the ends.
Do I need to lubricate the pins when reassembling?
No—unless the bracelet has a dry, gritty feel, metal-on-metal friction holds better. Lubricants can collect dirt and cause pins to back out.
Will removing links void my watch warranty?
Unauthorized resizing performed without damaging the bracelet typically does not void the movement warranty, but any scratches or stripped threads you cause won’t be covered. If the watch is new and under a dealer warranty, have the seller do the first sizing for free; many offer it at point of sale.
Explore This Topic
- Back to General
- Back to Bracelet Sizing
Related guides in this cluster:
- Watch Size Guide: How to Choose the Right Case Diameter, Thickness & Fit
- How to Authenticate Any Watch: Serial Numbers, Papers, Red Flags & Expert Tips
- Automatic vs Quartz vs Manual: Watch Movements Explained for Beginners

The We Know Watches editorial team brings together over 40 years of combined watch collecting, trading, and repair experience. Our editors have owned and handled watches from every major brand — from entry-level Seiko 5s to Rolex, Omega, Patek Philippe, and independent Swiss watchmakers. We’ve bought and sold at auction, worked with authorized dealers, visited manufacturing facilities in Switzerland and Japan, and serviced hundreds of movements ranging from the Seiko 7S26 to the Longines L888. Every guide and review we publish is based on hands-on experience, original research, and consultation with professional watchmakers. We do not accept payment for reviews, and we clearly disclose when we use affiliate links.